Toilet Installation Instruction
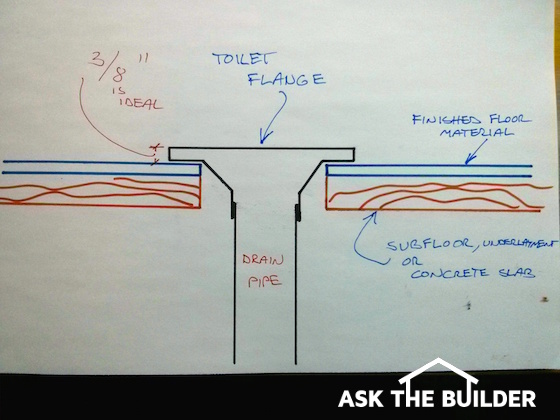
Toilet Installation Instruction | Here's a sideview of a normal toilet flange in a floor. The gap between the bottom of the flange and finished floor is just to show that the flooring goes under the flange. Most PVC flanges happen to be 3/8-inch thick at the edge so you want the flange to be tight to the finished flooring. Copyright 2017 Tim Carter
Toilet Installation TIPS
- It's not hard to install a toilet
- Toilet flange height is everything - see drawing below
- Use an additional wax gasket if flange is LOW
- Level bowl BEFORE installing gasket
- CLICK HERE to Get Tim's FREE & FUNNY Newsletter!
Don't Be Intimidated
Toilets are intimidating plumbing fixtures. Just look inside one. What about the mysterious connection at the floor. Oh, don't forget, there's the pesky water supply connection as well.
Are you afraid and feel it's time to call the plumber?
Not so fast! You can do it. Toilets are simple.
I'm been a master plumber since before the age of 30 and am going to help you step-by-step install one like I'd do it if I was at your home.
Let's get started. But before we get going, please WATCH this video just below I created to show you how floor joists or floor trusses can interfere with the location of a toilet. You can buy special toilets to solve the issue or sometimes scoot by with an offset toilet flange.
Basics
Residential toilets connect, in almost all instances, to a 3-inch drain line. At the floor level, this drain line converts to a toilet flange. This flange is basically a flair fitting that does two things:
- provides a way to make a positive air/watertight seal
- allows you to bolt the toilet to the floor
The flange must be a certain distance away from the back wall if you want your toilet to fit snugly against the wall. The standard measurement for most toilets is 12 inches.
Roughing In A New Flange
If a floor joist is in your way, you may need to go 2 inches in either direction (10 or 14 inch). If so, you'd need a special toilet bowl. Beware, as these are usually much more expensive. If faced with this situation try to use an offset flange. It may allow you to use a standard 12 inch toilet.
You don't want to hack or notch the floor joist as it will weaken it.
Free & Fast Bids
Toilet Flange Height
The height of the top of the toilet flange is critical with respect to achieving a seal so no sewer gas leaks into your home.
The top of the toilet flange should be 3/8 of an inch higher than the finished floor surface in the bathroom.
If the flange is too low or sits flush with the finished floor, the underside of the toilet may not contact all of the wax in the gasket.
If the flange is too high, too much of the wax will get squeezed out as you press the toilet to the floor.
Set Toilet First - NO Gasket!
I always want my toilets to be level. As such, I uncrate the bowl (the tank and the bowl are two parts - unless you have a one piece toilet) and simply set it on the flange.
Do not use the wax gasket at this point (don't worry, I'll explain!) Set your level across the bowl side to side and front to back. Using shims if necessary, make the bowl level. Gently lift the toilet off the flange keeping the shims in place.
The Wax Gasket & Bolts
A wax gasket is used to make a permanent seal between the flange and the bottom of the toilet. Without this gasket, sewer gas or wastewater would flood your house.

Here's a typical wax gasket with the plastic horn. This one is extra thick and you'd use it in case the top of your toilet flange was FLUSH or BELOW the finished floor surface. CLICK THE PHOTO NOW TO HAVE THIS DELIVERED TO YOUR HOME.
They come two ways: with and without a plastic horn. The horn is a simple funnel which directs the wastewater into the flange. I always get a gasket with a horn.
Place the gasket onto the flange pointing the horn down into the flange. Now install the new closet bolts that attach the toilet to the flange.
Take the bowl, straddle the flange and guide the bowl onto the gasket and the bolts. Be careful!!
You only get one chance. Use a friend to help guide you or to position the bolts.
The toilet will hit the gasket and seem to rock. Gently push the toilet down to the shims trying to keep it reasonably level. Attach the necessary trim washers, brass washers, and tighten the nuts. Remember, you are tightening against glass so don't go crazy and over-tighten!
Don't Lift Up
Once the toilet is tight to the shims, don't try to lift it up or move it too much. You'll break the seal!!!
As you drop the toilet bowl down onto the shims try to make sure the toilet is oriented correctly so the back of the tank is parallel with the wall.
The Tank
This is the easy part. Reading the toilet instructions you will see that two or thee bolts, rubber washers and brass nuts hold the tank to the bowl.
There's a usually a foam or rubber washer that fits on the bottom of the tank to provide a seal to the bowl. This is easier than a kid's erector set. As you tighten the tank bolts be sure to level it. It's a breeze.
Supply Tubes
Years ago plumbers used chrome-plated soft copper supply tubes. They were very hard to install.
Now you can use flexible stainless-steel braided water supply lines that are caveman simple to install. Don't over-tighten the nuts. These newer supply tubes come with a nice inner rubber gasket that only requires moderate tightening to get a leak-proof connection.

Here are the two ends of the normal stainless-steel toilet supply tubes. The larger nut attaches to the underside of the tank. These tubes come in different lengths. CLICK THE PHOTO NOW TO HAVE ONE OR MORE DELIVERED TO YOUR HOME.
Grout
Finish the installation with tile grout. Fill the space between the toilet and floor with grout.
IMPORTANT TIP: Don't allow the grout to touch the wood shims. The water in the grout can pull out extractive stains from the wood and STAIN your new grout. Keep the grout away from the shims about one inch.
Let this grout dry, remove the shims and grout the remaining holes. Total toilet project completion time: One to 1.5 hours!
Local Codes
Now that I have you all pumped up about changing your toilet, you better hold on for just a moment. Certain localities (states, cities, counties) have highly restrictive plumbing codes. In certain areas it is illegal for a homeowner to change out a toilet.
Only a licensed plumber is permitted to do it in these areas.
I have mixed feelings about these laws. Those in power try to make it sound that only plumbers have the ability to keep you safe from disease and thus they must install the toilet.
I'm a master plumber and am here to tell you if you follow the above advice you'll install your toilet much better than any apprentice plumber and quite a few journeymen.
I've grown weary of too many laws, regulations and other restrictions when it comes to doing work. If you do it right and possibly better than a licensed plumber, then what's the issue?
Column B359
Watch this video to see how Tim SOLVED a problem in minutes!
CLICK here to learn more on how Tim can help solve your problems.
5 Responses to Toilet Installation Instruction