How to Repair Cracked Backsplash Grout
 Repair Cracked Backsplash Grout | This is a close-up photo of a granite countertop that’s got a tile backsplash sitting on it. The grout between the tile and granite has failed. What’s the best way to repair this? Copyright 2021 Tim Carter
Repair Cracked Backsplash Grout - Do It In the Winter
QUESTION: Hello, Tim. I could use your help. The grout line between my kitchen granite countertop and the tile backsplash has cracked for the umpteenth time. Each winter the crack appears and each year I re-grout it hoping it will be the final time.
Am I using the wrong grout? How would you repair this and why does the crack disappear on its own in the summer? I have the same issue with other cracks around my home that mysteriously open and close depending on the time of year. Gary K., Columbus, OH
I swore off almost all gambling years ago when my wife caught me trying to make double-or-nothing basketball shots with my young son. She made me pay the $100 I was up to when she opened the garage door discovering me frantically trying to make a basket. Of course, he ratted me out because he thought he was rich. I’m pretty certain he still has that money and the shameful incident is brought up with regularity at family gatherings!
That said, I’m willing to bet that you might have a similar issue in your home with cracks that appear in the winter months and then disappear in the summer. It happens here in my own home.
CLICK or TAP HERE to get FREE BIDS from local handymen that can repair the cracked grout.
What Causes the Grout to Crack?
The source of the pesky cracks is water, actually water vapor. You won’t find these cracks in well-built motels made from concrete and steel. Concrete and steel are very stable and don’t change shape when wet. You find them in houses and buildings built with wood that are located in climates where it does get hot and humid in the summer months.
Wood is hygroscopic. This means that it changes in size in response to moisture content. Think of a piece of wood like a cheap synthetic sponge. When you get one wet, it swells. When it dries out, it shrivels up. The change in size is fairly dramatic.
This shrink/swell issue isn’t as bad in older wood-frame homes. I’m talking ones built using old-growth timber from the late 1800s or early 1900s. Modern framing lumber has been hybridized to grow faster and the light-colored spring-wood bands of wood fibers are much larger than the darker summer-wood bands when the tree growth slows because of the lack of water and oncoming winter.
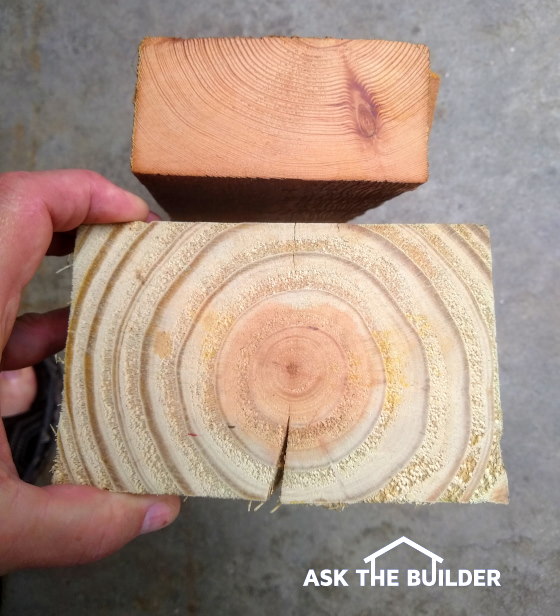
You’re looking at an old piece of lumber from the late 1800s versus a modern timber. Look at the difference in the size of the growth rings. The light-colored bands are spring wood and absorb lots of water vapor causing the wood to swell. Copyright 2021 Tim Carter
This newer hybridized lumber is much more reactive to changes in water content than the wood of old. It swells and puffs up slowly as the humidity rises in your home. Here in the northern hemisphere by the end of August, the wood framing in your home is like your lungs after you take an enormous inhalation of air.
As your home, and Gary’s, transition to January and February, this water is liberated from the lumber and the cracks bloom in your home like flowers in the desert after a 1-inch rainfall. The water in the wood is pulled out by the drier winter air in your home.
When Should I Repair the Grout?
In my opinion, the best way to deal with these cracks is in the dead of winter. Gary needs to stop using hard grout and switch to the best caulk with the most elasticity. This characteristic is often called out on the label of the caulk. You'll discover high-quality caulks at a home center or large hardware store.
What is the Best Caulk to Use?
Remember, the more expensive the caulk is, almost always it’s a better product. Why? In these cases, the manufacturer puts in better ingredients that almost always are more expensive.
Large deep cracks might have to be filled with a foam backing rod before you install the caulk. You’ll probably end up using a water-based caulk and as these dry and cure, they shrink. You minimize shrinkage by minimizing the amount of caulk you use.
How Do You Remove the Grout?
Gary needs to carefully scrape away all the failed grout. The granite top is pretty hard and very scratch resistant. That said, I’d use plenty of water and a new stiff 1.5-inch putty knife with a sharp edge. I’d get the countertop wet and slide the knife across the grout much like a snowplow pushes snow. I’d angle the tool so the grout is pushed towards the tile.
After going about an inch or two, I’d use a damp sponge to pick up any of the grit the putty knife loosened. You don’t want to grind that grit into the granite. I’ve never had issues getting up old grout from granite. The polished granite surface usually surrenders the grout with minimal work.
You do the same process to remove any grout from the vertical tiles, but it takes far more patience and skill. Work slowly and use a deft touch. Great lighting will aid the process. Feel free to use a child’s squirt gun to rinse grit down onto the granite top. Imagine you’re a dental hygienist for a day. Think about that. How cool is it to have one of those tiny fancy squirt guns they use to rinse teeth?
Once you have the grout all cleaned off, slide the tip of a paper towel into the crack between the tile and the granite to get liquid water that’s hiding in the void. Once you have all the water out, allow the crack to dry for 48 hours before caulking. I have a great caulking video on my AsktheBuilder.com website to show you exactly how I get a smooth joint each time. You should watch it.
Column 1393