Installing Large Format Wall Tile – It’s All Finesse
These large pieces of marble are in a master shower. This is not a beginner DIY project no matter what you’ve seen on TV cable shows! (C) Copyright 2020 Tim Carter
DEAR TIM: I’m remodeling a large bathroom in my home. The large shower stall is going to be tile as well as the floors in the room. I cut out some pieces of scrap cardboard to resemble large-format tile and it’s going to look perfect. I’ve never done a job like this. I’ve done my own tile work for years and had decent results, with the largest tile installed 8x8 inches. What tips can you share to ensure success? I want this job to look perfect in every way. Tom B., Charleston, SC
Do you have the drive and passion for tough DIY jobs like Tom does? If so, that’s a remarkable quality. I applaud it. Some pros try to talk you out of things. I will in certain situations if I know something is far too difficult or requires hundreds of hours of practice. Installing tile is not one of these situations, but installing large-format tile is absolutely one that a beginner should not try.
It’s important to realize that almost all tile and natural-stone products are made so the top surfaces are smooth. There are any number of Mexican tiles and some others that have an uneven top surface or slight bullnose edges, but let’s not worry about those for this discussion. I’m going to assume Tom is installing a tile or natural stone that’s got a very flat top surface.
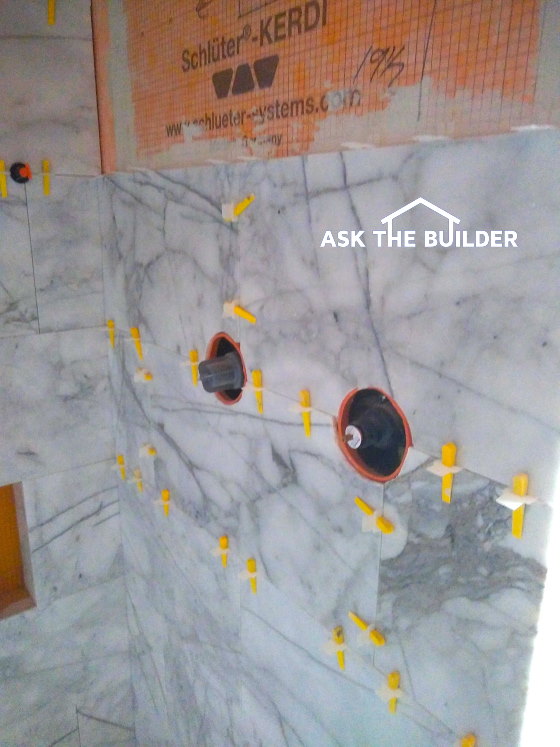
For a finished tile job to look spectacular, the tile need to be in the same plane once installed. This doesn’t necessarily mean level and plumb, although those are two noble goals you should aspire to.
Flat, or in the same plane, means that the surface has no humps or dips in it. Imagine placing a large straightedge on a surface and the bottom of the straightedge on the tile. When the tile is in the same plane, there will be no gaps under the straightedge and it will not rock back and forth on a high spot like a teeter-totter.
When remodeling, you may have to apply thin shims or strips of wood to wall studs to get them all in the same plane. The tile backer board will conform to the studs so if the studs are all cattywampus, that Tim Talk for askew, then the backer board will mimic this unacceptable surface.
Forget about using large-format tile for the shower floor. You need to choose something that’s small because I’d recommend you install tile on top of a preformed shower base kit that has the shape of a very shallow funnel. You want all the water to run to the drain and these preformed shower floor kits achieve this goal. Large-format tile will have voids under them and will eventually crack.
If you’re building a new home, I highly recommend the use of floor trusses to get a perfectly smooth floor surface in wood-framed houses. If building on a concrete slab, ask the concrete masons to take extra time to get the floors flat in the places you’ll have tile. In a remodeling situation, you can use pourable floor-leveling compounds to get a floor nice and flat.
Be sure to install floor tile over a mat made to uncouple the tile from the floor. There are quite a few systems out there and this newer technology is paramount to a long-term crack-free tile floor. Pay very close attention to the stiffness of a wood floor system. If the floor is bouncy, there’s a good chance your large-format tile will crack over time. It’s a major job to try to stiffen an existing floor and that’s the subject of another discussion we may have on another day.
You may want to look into the wedge floor leveling products. These are handy products that allow you to get the top surface of adjacent tiles all in the same plane. The industry standard for allowable offset is 1/16th inch. This is actually quite large and you can almost always have a much tighter tolerance.
But be aware that if the wedge starts to pull one tile up out of the gooey thinset to make it flush with the adjacent one, a void space may develop under the lifted tile and that’s a possible crack location. This is why getting the floor flat in the first place is so important. These problems are minimized with smaller-format tile.
Once you have the tile installed, all your hard work can be ruined if you don’t know how to grout the tile. You need to use the right grout to avoid issues. Unsanded grout can be used on joints up to 1/8-inch in width. Use sanded grout for larger joints.
Water is your friend and enemy when grouting. Too much water when mixing will ruin the grout. Too much water when wiping and striking the grout joints will absolutely ruin it. Please watch my four-part Grouting Floor Tile series on my AsktheBuilder.com website so you don’t ruin your new tile!
Column 1341
2 Responses to Installing Large Format Wall Tile – It’s All Finesse