How to Install Mosaic Tile
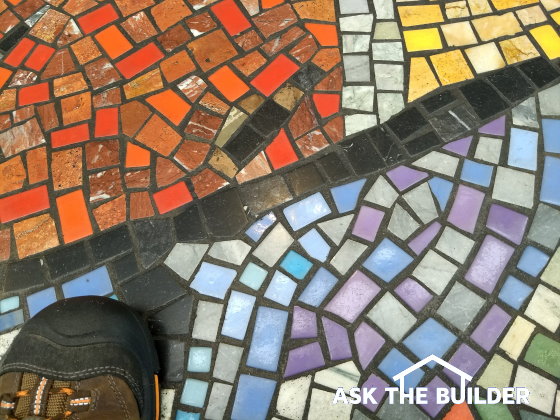
How to Install Mosaic Tile | This is a small section of a huge mosaic tile floor in an airport. The tip of my shoe provides scale. There were tens of thousands, maybe more, of small pieces of tile that made up a gorgeous scene. You can do the same! Copyright 2021 Tim Carter
How To Install Mosaic Tile - Start With a Small Project
QUESTION: Tim, I need your guidance. I’m want to know how to install mosaic tile. It's a floor in my new room addition. I have no clue where to start. I’ve never done tile work before.
Do you think I’m crazy for attempting this? If not, what can you share to ensure success? I don’t want to goof up and have to rip it up. There will be some heavy furniture on the floor. Is that an issue? Rebecca T., Tuscon, NM
Do you have dreams like Rebecca of an eye-popping drop-dead gorgeous mosaic tile floor? A DIY mosaic tile floor is absolutely possible for a beginner, but as with many things you and Rebecca need to take baby steps before pressing your feet against the starting blocks 100-meter world-class runners use to blast off from the starting line.
What is Mosaic Tile?
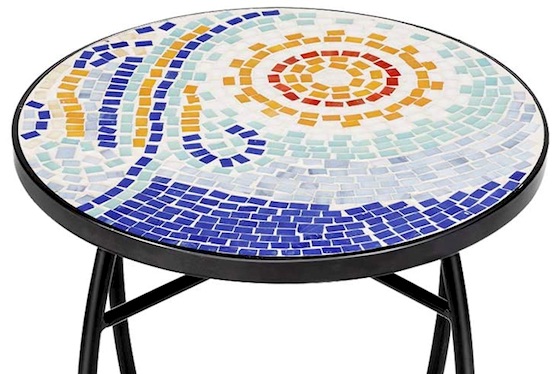
Mosaic tile is a blend of both artistic skills as well as tile craft. You can put mosaic tile on floors, walls, or even a tabletop. Look at this small plant stand tabletop and the simplistic design:
I’ve seen mosaic tile installations that make my eyes hurt they were so poorly thought out or the installer/artist rushed the job. I suggest we unpack the project splitting it into two parts.
Let’s discuss the artistic aspect first. I’m not an artist but I know enough to realize that a mosaic tile scene can either be abstract or create a representation of something you or another person would recognize. For example, Rebecca might be trying to create a mosaic of the mountain scene at sunrise she sees from a window looking out of her room addition. It could be a mosaic of a flower or a pet. There are countless things you might try to recreate using small colored pieces of tile.
What Size Should My Test Mosaic Tile Be?
Having never done this before, you and Rebecca should start small. I’d try to create some small tile mosaic that measured maybe 2 feet by 4 feet. I feel that gives you enough real estate to create something that you might recognize. If you just want it to be a random abstract mosaic, then this size is a good sandbox to play in.
Should I Create A Drawing First?
My guess is an artist might start with an actual scale drawing of what the mosaic is with all the correct colors and shading. Choose something simple. Don’t be trying to recreate the Last Supper scene for goodness sake. This would be the deal-breaker for me because I’m only halfway decent at drawing stick people. You, though, may have an artistic bent and you should follow it!
Using your color drawing as your north star, gather pieces of tile that are all the same thickness and begin to cut and snip them to the correct small sizes that you’ll need. If you’re a digital person, try to image that each small tile would be a pixel that is on a smartphone or tablet screen image. You can also visit websites that have countless photos of finished mosaic tile pieces to grasp what you need to do.
How Big Are the Grout Joints for Mosaic Tile?
You’d do well to lay the cut pieces of tile next to one another on the floor making sure you allow for a grout line that might be as narrow as 1/8-inch around each piece of tile. Sanded grout is more durable than unsanded grout because it contains fine silica sand. Unsanded grout should never be used for joint larger than 1/8-inch. Avoid sanded grout joints larger than 1/2-inch.
How Do You Cut and Shape Mosaic Tile?
You can use tile nippers to shape thin tile. Beware of using porcelain tile as your starter project as it’s extremely hard and very hard to snip and shape. Use a softer tile with a traditional clay core. These snap with ease.
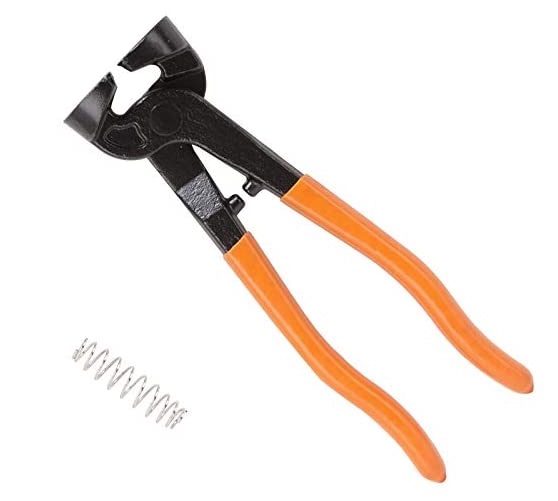
CLICK or TAP HERE to have these nippers nipping things in your hands in just days.
Once you have your mosaic created and you’re happy with the look standing back staring at it from five or ten feet away, most of the hard work is done. All that’s left is to install the tile and grout it. The issue is installing individual pieces of mosaic tile is the hardest tile to install in my opinion! Ugh! Don’t worry, you’re going to do it and it will come out fine.
What Adhesive is Used to Install Mosaic Tile?
Floor tile must be installed in thinset. Thinset is simply fine silica sand mixed with Portland cement. It’s what mice would use to install tiny brick if they built brick homes. Thinset allows the mosaic tile to bond well to solid subfloors and once the thinset is cured, it’s almost as hard as a rock and it doesn’t move. Organic tile mastic that’s like thick cake icing is never to be used to set floor tile. It can move and the tile will crack.
How Big Should the Thinset Trowel Notches Be?
The secret to installing the mosaic tile is to match the size of the tile to the trowel that will be used to put down the thinset. If your mosaic tile is about the size of a postage stamp, let’s say 1 inch by 1 inch, then you need to use the smallest notched trowel you can find. Most certainly a 1/8 x 1/8-inch square-notched trowel would be in order.
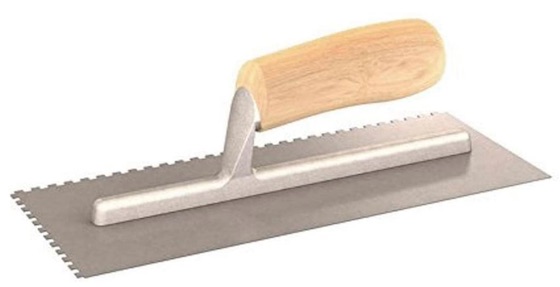
CLICK or TAP HERE to have this 1/8 x 1/8-inch trowel delivered to you by a special courier.
How Do You Hold the Trowel?
Hold the trowel at about a 30 to 45-degree angle as you spread the thinset on a piece of cement board you’re using for your experiment. Get the cement board damp with water before spreading the thinset.
Only put down as much thinset as you can cover with tile in five minutes or less. Rebecca has to work fast because she lives in a dry climate where the thinset can skin over rapidly. If this happens, the bond is poor between the thinset and the pieces of tile.
Avoid allowing any thinset to ooze up between the pieces of tile. Remove any ooze immediately making sure you don’t smear it on the face of the tile. The top of each tile must be in the same plane so place a small piece of smooth perfectly flat plywood on the tile and lightly tap it so the tops of the tile are all in the same plane.
Use sanded grout to finish the job. Watch my four How to Grout Floor Tile videos to see how this is done. If you use too much water, you can ruin all your hard work!
Tim, This is Too Hard - How Can I Do an Easy Tile Job?
CLICK or TAP HERE to do a sandbox tile job where you don't have to cut one tile!
Column 1405