Stucco Crack Repair Products

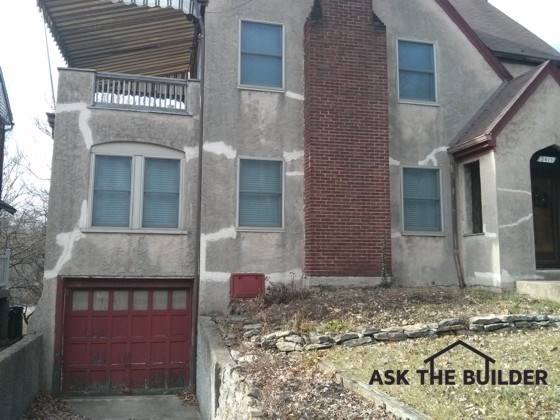
The person who tried to repair the cracks is this stucco made several critical mistakes, the first one not cleaning the stucco first! Photo credit: Tim Carter
DEAR TIM: I purchased an older stucco home that's never been painted. It's got some cracks in the stucco. Most range in width from 1/4 to 3/8-inch wide. The cracks are not getting any bigger and a structural engineer said that all is well and the cracking will not continue. What's the best way to repair them so you can't see them once the work is complete? It seems an almost impossible task as every stucco house repair I've seen looks worse than the narrow crack. Do you have a process that will yield magical results? Pat M., Dayton, OH
DEAR PAT: Your project is absolutely the most difficult since the stucco is natural and has never been painted. I liken it to a tailor trying to repair a tear in fabric. No matter how skilled his stitching, you probably can see where he tried to mend the garment.
The good news is there's a good chance you can make a repair that will match the existing stucco, but it's going to take some work and experimentation on your part. You'll just fill the cracks only with the repair material not allowing any of it to splatter or spread onto the existing stucco. This is very important.
The biggest mistake I see most people make in these instances is they don't clean the stucco first. I do realize some people don't want to ruin the patina that old stucco has attained with age. If this is the case, your job just becomes one or two steps harder because once you get the right mixture of the stucco repair mix, you'll have to use small amounts of mortar pigments to get it to match the different colors of the adjacent stucco.
 If you decide to clean your stucco, you can use an oxygen bleach solution and a scrub brush to get great results. You might want to add some liquid dish soap to the cleaning solution. The oxygen bleach will not harm any vegetation and it will clean off, dirt, diesel soot, mold, mildew, algae, etc. leaving the stucco sparkling clean.
You can also use a pressure washer, but you need to be very careful around the cracks and where the stucco might end next to trim boards, windows and doors. You don't want to pump in lots of water behind the stucco causing hidden damage.
Once the stucco is clean and dry, you now know what you have to match with respect to color and texture. What you'll notice when you look closely at the stucco is that you see many individual grains of sand. They'll be different sizes and different colors. The same is true for older brick mortar.
If you do the math, you'll discover that the sand makes up a majority of what you see. Much of the color of the stucco is derived from the blended color of the sand. Your job is to visit local sand and gravel quarries and try to locate sand that matches the sand in your stucco. The odds are great that you'll find it. Purchase a five-gallon bucket for now so you can begin your testing.
When your stucco was mixed, the mason used two ingredients, maybe three. For sure he used the sand and he added Portland cement. Older masons also often added some hydrated lime to make the mixture bond better to the wall. The lime also adds an interesting characteristic in that in can help heal small hairline cracks that develop over time.
What's more, your stucco home looked a different color when it was first built. At that time, each of the sand particles had a thin coating on it of the Portland cement and possibly the lime if it was in the mix. Mother Nature wears this coating off over time and then you start to see the actual color of the sand. This is why a tuck-pointed brick joint stands out like a sore thumb in most cases. It's monotone because all you see is the color of the cement paste.
Your job is to try to locate a Portland cement that once dry and cured matches the color of the paste you now see in between the grains of your stucco sand. You may have to experiment mixing different amounts of Portland cement and hydrated lime to get the color you need. When mixing batches and allowing them to dry, don't do this in direct sun. Keep the samples in the shade the entire time so they dry slowly. Keep them damp for at least a week.
Once you feel you have the correct proportions of Portland cement and lime to get the right color, make up a test batch of stucco. I'd generally mix two parts sand to one part Portland cement / lime blend. You may find that a mix of three parts sand to one part Portland cement is what best matches your stucco.
Once mixed, trowel this onto a small piece of cement board that's about one foot by one foot. Put the mixture on about 1/4-inch thick. Try to match the texture of your stucco using brushes, trowel strokes, etc. Once it sets up, keep it damp for a week. Keep the sample in your garage out of the sun for a month.
At the end of the month, mix up a solution of muriatic acid and water, one part acid to ten parts water. Put on old clothes, rubber gloves, goggles, etc. as this acid mixture is dangerous. Slightly dampen your sample stucco with water then brush on some of the acid solution. Start to scrub it with an old scrub brush. You're trying to wash off the cement paste from the stucco to reveal the colored sand.
Rinse and allow to dry. Take the small panel out to your stucco and see how well you did to match what you have. If you're not close, keep experimenting until you get the right proportions of ingredients. When you do, just clean out the cracks, mist them with water right before filling them and do all the work on cooler overcast days. After sixty days then carefully scrub off the cement paste from the stucco mix in the cracks with a toothbrush using the acid solution. Do not allow the acid solution to touch the existing stucco. Good luck with this!