Stone Chimney Cap
DEAR TIM: Our house has an usual chimney made with irregular stones. The existing cap is in poor shape and I'm worried about damage. Each contractor I talk with has a different solution and none of them are even similar. What's the best way to install a cap on a masonry chimney, no matter if it's stone, brick, or concrete block? Are there best practices that should be followed? If I could wave a magic wand and transport you and your tools to my house, how would you rebuild my chimney crown? Theresa D., Boulder, CO
DEAR THERESA: Be careful what you wish for when you wave that wand! I love Colorado and it wouldn't take much to get me out there. But in my absence, I'll bet there's one or more great contractors in your city that know the correct way to install a masonry chimney cap. If not, I'm going to give you the specifications in this column so you can help educate one, or more, of the contractors.
There are best practices when it comes to chimney caps or crowns. Unfortunately most roofers, masons and chimney sweeps are either unaware of them and / or don't employ them. I say this because I'd estimate less than 1 in 10,000 chimneys have a cap or crown installed following the best practices.
It's vital that a chimney have a proper cap or crown. Chimneys, when you look at them, are just miniature houses. They have four walls and are exposed to the weather just like a simple house.
Look at houses that have stood the test of time and what you'll discover is the roofs on these houses almost always have a good slope to them, they have generous overhangs, and the roofs are built to withstand years of the harshest weather. You can build chimney caps the same way, but most builders don't.

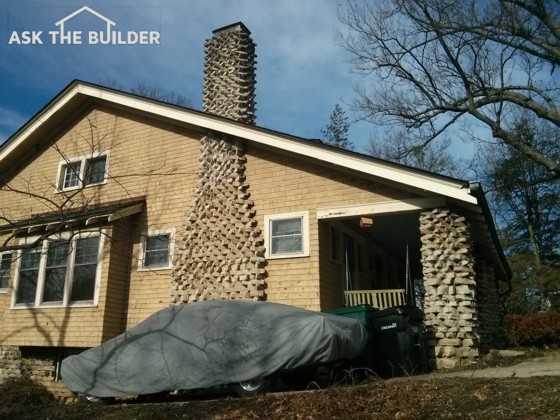
Even from the ground an expert can see this stone chimney doesn’t have the right cap on it. Don’t be fooled by the metal hood. Photo credit: Tim Carter
If I were transported to your home, here's how I'd construct your new chimney cap. I'd gather the following materials: a sack of pure Portland cement, rubberized asphalt membrane material, small pea-size gravel, coarse sand, assorted pieces of lumber for forms, 40-pound tin, 3/8-inch primed and painted steel rebar, 3/8-inch open-cell foam, and special urethane caulk used on commercial building brick expansion joints.
The chimney cap I'd build would be a reinforced sloped concrete slab that would overhang the edges of your stone chimney by about three inches on all sides. It would have a special flashing under the poured concrete that would capture any water that might make it through the concrete cap.

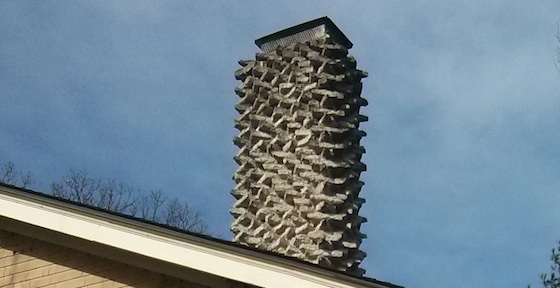
Here's a closeup of the top of the chimney. There's no overhanging concrete cap or crown. Photo credit: Tim Carter
Water is a chimney's archenemy. This is especially true if the chimney is located in a cold climate where water can freeze. Water that enters a chimney can freeze and break apart a chimney in just a few years. Water that hits the top of the chimney must be collected and redirected away from the chimney.
The first step is to remove the old chimney cap and repair any of the stones at the top that might be loose. At this time it's also a good idea to float a thin coat of cement stucco over the solid fill of the chimney ensuring it has a slight slope towards the edges of the chimney sides. This stucco is the foundation for the flashing under the cap.
Using the 40-pound tin-coated steel, I'd fabricate pieces of L-shaped metal that would rest against the clay flue liners that project up through the chimney cap. I'd solder these at the four corners and get them to fit tight against the clay liners. I'd also fabricate similar pieces of the tin that would overhang the outside edges of the chimney stone.
These outer pieces would extend in towards the flue liner at least 4-inches and they'd hang down chimney at least 1.5-inches. I'd also put a bend on the lower exposed edge of the tin so it kicks out at a 45-degree angle away from the sides of the chimney. These four pieces of tin would also be soldered completely at the four corners. I'd prime this metal and paint it a color that matches as close as possible the stone.
The rubberized membrane would lap over the metal at the outer edges of the chimney and the metal at the flue liners would rest on top of the membrane. Extra strips of the sticky membrane would be then be placed over the tin that rests on the membrane at the flue liners to make a waterproof seal.
I'd now use the lumber to create form work that extends around the chimney top so the cap will extend out from the stone 3-inches. One inch in from the edge of the cap I'd place a 1/4-inch square piece of wood nailed and glued to the bottom of the form. This mission-critical piece of wood is going to create the all-important drip kerf on the underside of the poured cap.
The thickness of the cap slab would be 2.5-inches at the outer edge and would get thicker as it approaches the clay flue liners. It would have a generous slope insuring that water flows to the edges of the cap.
The foam would be used to wrap around the flue liners. You don't want the concrete cap to contact the flue liners as the heat from fires causes them to expand. They need room to do this against the cap.
The concrete mix for the cap would be three parts gravel, two parts sand and two parts Portland cement. The reinforcing steel would be placed in the middle of the slab and would be placed at 4-inch centers both directions. A nice smooth finish would be placed on top of the slab. After it cures, I'd tear out about 3/8 of the foam and caulk the gap with the special caulk.
Column 1081
4 Responses to Stone Chimney Cap