Spring Exterior Home Maintenance

This house may look like it’s ready for another year, but there could be some problem areas. (C) Copyright 2017 Tim Carter
Spring Exterior Home Maintenance TIPS
- Some checklists miss important items
- Concentrate on water and UV light damage
- WATCH plumbing vent video below
- Use special epoxy for concrete and blacktop repairs
- CLICK HERE to Get Tim's FREE & FUNNY Newsletter!
DEAR TIM: I’ve live in a quaint Cape Cod-style home and try to keep it in great shape. I’ve seen lots of checklists for spring exterior home maintenance and most just have the same old advice.
I thought you might have some extra things to look at that others overlook. Imagine I were to hire you to do an exhaustive walk-around of my house after Old Man Winter had gone back north.
What are the small things you’d be looking for that could cause massive headaches down the road? John J., Decatur, GA
DEAR JOHN: I’ve seen those standardized spring checklists over the years and sort of chuckle at many of them.
Great Intentions
I realize the authors have good intentions, but I often wonder if they’ve ever done any hands-on repair work for paying customers. If they had, then they’d probably add a few other items to their lists.
CLICK HERE to get FREE & FAST BIDS from local roofers who can look at your chimney and roof safely.
Ho-Hum Normal Items
Here’s the normal things I see on the checklists. Often they lack detail as to what to really look for. For that reason, I feel the lists are of not much value. You’ll see things like: check the roof for shingle damage, caulk cracks around windows and doors, repair chipped paint, check windows and doors, check chimneys, etc.
Water and UV Biggest Dangers
Water and ultraviolet (UV) light are the two big things that cause problems to homes, so I suggest we focus on these.
I suggest we start at the top and work our way to the bottom.
Chimney Inspection
Chimneys are very important. If you can’t safely get on your roof to inspect it, hire a chimney sweep. The most important thing to look at is the chimney crown or cap. It’s the roof of your chimney.
Most of the ones I’ve seen have been installed incorrectly and they crack. You don’t want water getting into a crack in the crown. There are special mastics made that can coat the crown and they perform quite well.
Check for missing mortar and replace as necessary using hydrated lime and volcanic ash with sand for the strongest and longest-lasting mortar.
Inspect Roof Flashings
Look at your roofing materials and pay close attention to the flashings. The most common flashings are step flashings and plumbing vent-pipe flashings. The step flashings are interlaced into the shingles and are up against chimneys and where roofs but up against taller walls of the house.
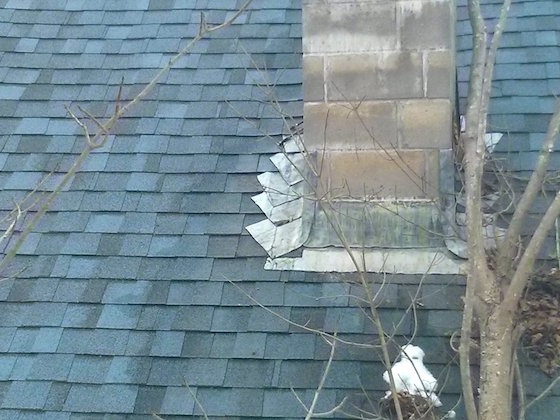
Look at this photo of a BAD SET of step flashings on a chimney I saw in NH. They just barely work, but far too much of the flashing is exposed than needs be. Each successive row of shingles is supposed to sit on top of the step flashing that in on top of the shingle below it.
Here it's quite possible the idiot roofer just butt the shingles into the chimney and then put in the step flashings on top of them. It's hard to know without getting up on the roof and peeking up under the step flashing to see what he did.
Normally you'd never see the flashings. That's why I took this photo because you can see them here!

The step flashing overlap one another and are to be laced into the shingles. The idiot roofer here didn't install them at the right angle. Rain, especially wind-driven rain, can blow under the upper left corner of each piece you see. Copyright 2017 Tim Carter
Look for excessive shingle granule loss in small patches, cracks in shingles and any slight curling at the shingle tips. Replace these damaged shingles as necessary.
CLICK HERE to get FREE & FAST BIDS from local roofers who can look at your chimney and roof safely.
Plumbing Vent Pipe
One common trouble spot are the cheap aluminum and rubber flashings around plumbing vent pipes. The black rubber boot tends to crack over time where it touches the vent pipe allowing water to leak into your home. The best plumbing vent flashings I’ve seen are the ones that have a special siliconized-rubber compound that stands up against the harsh UV light from the sun.
Best Plumbing Vent Pipe Flashing Video
Watch this video to see the only flashing I'd use on my plumbing vent pipes. CLICK HERE to order this flashing now. You'll need to know the diameter of your vent pipe. Normally it's 3 inches, but it could be 4.
Downspouts and Gutters
If your home has gutters and downspouts, be sure they’re clean. Spring is the worst time of year for gutters as the flowers from deciduous trees and the winter buildup of bark, twigs and other debris can choke gutters with an organic smorgasbord. After the gutters are clean, do a water test with a garden hose.
Test to see if there are any leaks in the system. There are special caulks meant to seal the seams in aluminum gutters and they’re available online.
Pipe Roof Water AWAY From House
Be sure the water from downspouts is piped to the lowest part of your yard or connected to approved storm drains in urban areas. Water dumping out on the ground next to your foundation on splash blocks is a very bad thing as the water just enters the soil next to your home.
If you have a basement or crawlspace, this water will almost always cause nightmares.
Don't Caulk Vinyl Siding!
Don’t just go around caulking cracks around windows and doors willy nilly. Your home may have vinyl siding and the j-channel around doors and windows shouldn’t be caulked. It needs to expand and contract.
Inspect Decks Closely
Decks are big problem spots. Many people ignore their decks. You need to inspect the railings closely to ensure they’re sturdy and will not fail if lots of outward pressure is applied.
Get under the deck and look at all the galvanized metal connectors. Look for corrosion. If the corrosion is severe with lots of rust, you may have to replace a connector.
Copper and Zinc Don't Play Well
Look at the fasteners used to install the metal connectors. Are they corroded or have they pulled out? Each time water enters a crack in treated wood, it has the tendency to make the crack bigger because the water gets deeper into the wood causing it to swell.
Important structural nails can pull out. Consider replacing all nails with special exterior screws meant for the newer treated lumber that contains lots of copper.
Proper Soil Slope
I’d take a good look at the soil around your home. Be sure you have excellent positive drainage. You want the soil to slope away from your foundation.
It’s best to have at least 6 inches of foundation exposed above the soil line. Don’t add mulch to garden beds creating a moat around your foundation. Don’t allow water to be trapped between the foundation and the mulch.

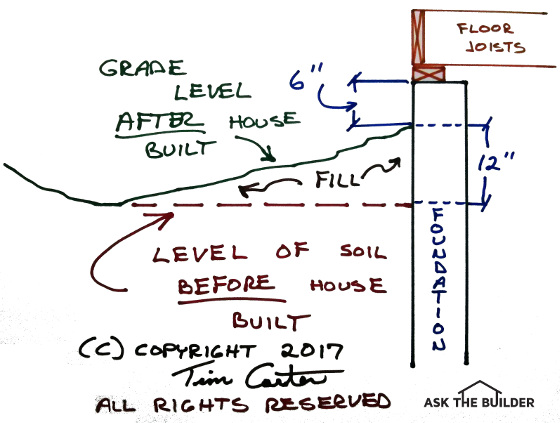
I made this drawing. You can see the foundation wall with a typical sill plate and floor joist. The red line is the lot before the excavator shows up. The top of the foundation should end up 18 inches ABOVE the red line. Use the dirt from the hole to create the slope away from the foundation. (C) Copyright 2017 Tim Carter ALL RIGHTS RESERVED
Concrete and Blacktop Repairs
Look for damage to any concrete or blacktop pavement, sidewalks and patios. Cracks in concrete can be repaired with special epoxies that are applied with a common caulk gun you probably own. You can use this same epoxy to repair cracks in blacktop disguising the compound with small rocks and sand you press into the fresh epoxy.
CLICK HERE to watch a video and SEE THE EXACT Epoxy I'm talking about.
If the surface of concrete has flaked off, you can make up a stucco mix with Portland cement and sand to repair it. To get a fantastic bond, be sure to paint the old concrete with cement paint before applying the stucco. Cement paint is made by mixing Portland cement with fresh water. It’s a secret trick taught to me years ago by an old mason.
CLICK HERE to get FREE & FAST BIDS from local roofers who can look at your chimney and roof safely.
Column 1188