Roof Cap Shingles Installation

Roof cap shingles installation like this is very simple. I could teach you to do it in ten minutes. Actually, it's SO EASY I can teach you how to cut cap shingles in LESS THAN A MINUTE! CLICK or TAP HERE and watch my short video. Copyright 2017 Tim Carter
Roof Cap Shingles Installation Is Easy
I remember the first time I installed roof cap shingles. I had never done it before, but within minutes I was pounding nails through them at the peak of the roof of a house I was rehabilitating in Cincinnati, Ohio.
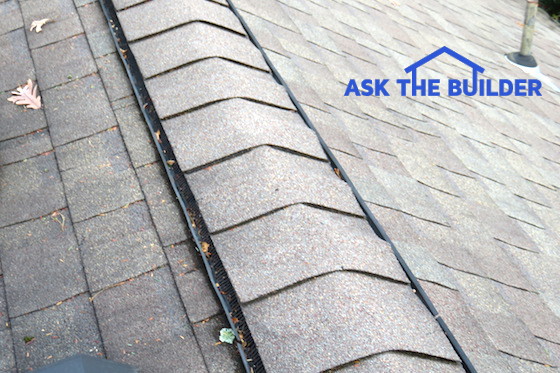
Roof cap shingles overlap one another at the peak of a roof or along a hip where two slanting roofs meet on an outside corner of a house.
The cap shingles for most roofs measure 12 inches by 12 inches.
It's important to realize the amount of shingle exposed to the weather is only 5 inches.
Related Links
Asphalt Shingle HACKS and Installation Tips
Great Nail Gun for Asphalt Shingles - It's FAST!
Free & Fast Bids
CLICK HERE to get FREE & FAST BIDS from local roofers who can install roof cap shingles.
Make Your Own Cap Shingles
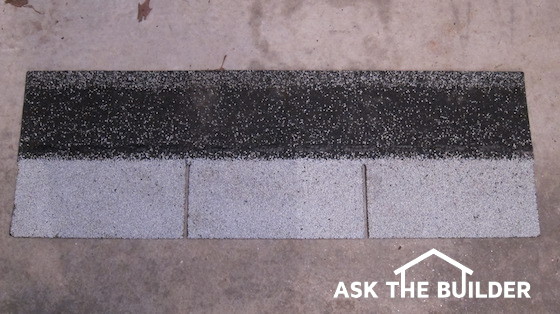
You make your own cap shingles if you're roofing material is the standard three-tab shingle. Here's what a three-tab shingle looks like:

This is a standard three-tab shingle. The tabs are the three parts separated by the narrow grooves. The full shingle is 36 inches wide and 12 inches high.
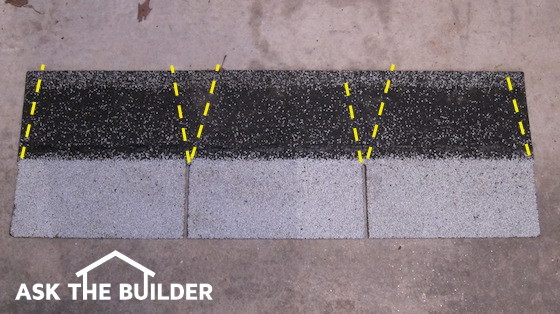
A cap shingle is made by turning over this three-tab shingle and making two angled cuts to remove a small amount of the shingle.
Look at the photo below to see where to make the cuts:

The yellow lines show where you make the cuts to create three cap shingles from one standard three-tab shingle. Copyright 2017 Tim Carter
Dimensional shingles and other specialty shingles come with their own pre-cut cap shingles. You don't have to cut anything like you see above. Be sure to ask about these when you order architectural or dimensional shingles.
Installation and Overlap
You need to be aware of the prevailing wind direction where you live. This is the direction the weather usually approaches your house. North and west are the prevailing directions here at my home in central New Hampshire.
The first cap shingle that goes over the ridge starts at the end of the ridge DOWNWIND of the prevailing weather direction. In my case I'd start the first cap shingle at the south or east end of any primary ridge.
Use The Right Nails
You need to use at least 2-inch-long nails for roof cap shingles installation.
Why?
The standard 1 and 1/4-inch nails are not long enough to penetrate through all the roofing material up near the ridge. The cap shingles can blow off in a storm if you use short nails like my neighbor's cap shingles did last year.
Ninety-eight percent of all roofers - a close guesstimate - take a shortcut and use 1 and 1/4-inch nails. Don't let it happen at your home.
Chalk a Line
Measure down 6 inches from the center of the roof ridge and chalk a line parallel with the ridge. Butt the edge of the first cap shingle along this line. Put in one 2-inch-long nail back 6 inches from the edge of the cap shingle.
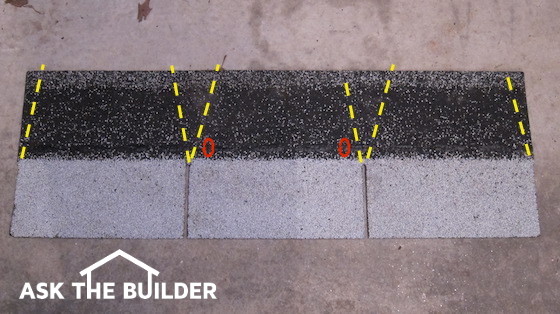
This nailing area is right where you see the dabs of black asphalt cement that are just above the tab knockouts. I've put two small red ovals on the shingle below to show you where to nail.
The next overlapping cap shingle MUST cover the nails. The only place you'll have exposed nails is your final cap shingle. You can put a dab of roofing cement over them and cover the cement with a bunch of the colored granules that are in the shingle wrappers.

See the red ovals? That's where you drive a nail to secure the cap to the roof. Copyright 2017 Tim Carter
One After Another
The second cap shingle overlaps the first one. You want to only have five inches of the first cap shingle visible.
Repeat this until you get to the end of the ridge. The last two cap shingles will need to be trimmed so they don't overhang the ridge.
CLICK HERE to get FREE & FAST BIDS from local roofers who can install roof cap shingles.
5 Responses to Roof Cap Shingles Installation