Marble Tile

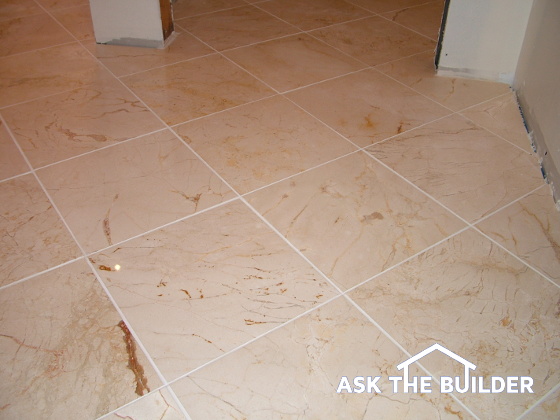
This marble tile floor took two days to install, but was well worth the effort. PHOTO CREDIT: Tim Carter
DEAR TIM: My wife insists on marble tile in our bathroom. I’ve never worked with marble tiles and wonder about how smart a choice they are. Is marble floor tile durable? What are the top things I need to know to ensure the marble tile flooring is installed so that it doesn’t crack? Is cleaning marble tile an issue once it’s installed? Steve P., Florence, KY
DEAR STEVE: Your marble tile bathroom is going to look splendid once complete, and best of all, your wife will be smiling ear to ear. Surely you’ve discovered by now it pays in spades to have a happy wife. Marble tile flooring is not new by any stretch of the imagination, and with minimal care and effort it will look gorgeous for many years.
Marble is a natural stone that is formed when limestone is heated and subjected to intense pressure. The crystals in the rock reorganize often creating a denser rock with interesting coloration and veining. Marble can be a softer stone when compared to granite or porcelain tile, but all the same it’s fairly durable. There are some marbles that are as hard as granite, so look for those if you want the most durable flooring. Sand and acidic liquids are marble tile’s biggest enemies. If you can keep these things out of the bathroom, you’ll be able to keep the marble sparkling for years.
Some marble tile is fragile out of the box. In fact, I just installed marble floor tiles that had a tendency to crack along the coloration veins. Only a few tiles in each box seemed to want to do this, so I had to be careful about how each tile was handled. But once the polished marble tile is set firmly in the cement-based thinset mortar, there’s no issue. The thinset mortar bonds the marble to the subfloor permanently, and it prevents the marble from separating.
Marble is like any ceramic tile or natural stone when it comes to cracking. These materials all have impressive compressive strength, meaning they don’t fail if you squeeze them. But if you bend or stretch marble, it can crack with ease. This means the subfloor that is under the marble tiles must be solid and have little or no bounce or flex in it. If it’s a wood subfloor, you don’t want seasonal changes in humidity to cause cracks as the floor picks up moisture and swells. This situation can be solved by making sure you install the marble tile on top of a crack-isolation membrane.
It’s also very important for the subfloor to be in the same plane. This means that there are no bumps or dips in the floor. You can make the floor be in the same plane by using a self-leveling underlayment compound that pours onto the floor like runny pancake batter. Once the material spreads out and levels itself, the floor is in the same plane. Just about all of these materials are rated to be used under marble tile.
Before you start the job, be sure you talk with your wife about the orientation of the marble tile in the room. The easy way to install marble tile is with the side of each tile parallel with a wall in the room. But you’ll discover that if you want to make the floor really look interesting, you’ll install the tile diagonally in the room. This means the tile are set at a 45-degree angle to all the walls. This method is much harder when it comes to cutting each tile, but the final look is stunning.
I’ve had the best luck using a one-eighth-inch gap between each tile. I maintain this spacing using clever plastic spacers that are circular. These spacers are shaped in such a way that one side is used where four tiles intersect and the other side can be used to create the exact gap at any point along the edge of a tile. They are reusable as they sit on top of the marble tile. I don’t like the spacers that drop down in the gap between tile. They can interfere with the thinset mortar causing a mess.
If you don’t exceed a gap of one-eighth inch between each tile, you can use unsanded grout between the marble tiles. I like that look, and the lack of silica sand in the grout ensures that the highly polished surface of the marble won’t get scratched as you spread the grout on top of the marble. To prevent shrinkage cracks in the grout, be sure it’s mixed with minimal water. The grout should be the consistency of cool cake icing that will not sag if you tilt the bucket on its side.
Once your marble tile is installed, take care of it with regular cleaning. Be sure to avoid using abrasive cleaners. If you can find a neutral pH cleaner, use that. These products can often be found at stores that just sell stone products. You can find them easily if you do an online search.
The trick is to perform regular cleaning and not wait for months before you tackle a cleaning job. If you just do a simple cleaning once a week, you’ll discover it’s not hard to clean the floor. The problems start when the tiles or the grout get heavily soiled and you try scrubbing your way out of the mess. With regular care, you just need a sponge and dry rag to make the marble shine just as it did the first day you walked on it.
Column 790