Kitchen Exhaust and 4-Way Switch Conundrum

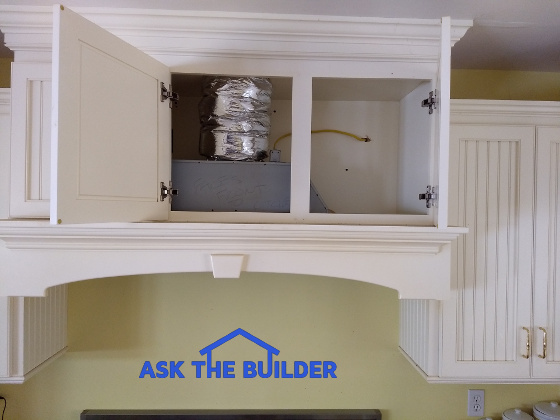
This is a high-powered kitchen exhaust fan tucked up and inside a decorative wood cabinet. (C) Copyright 2018 Tim Carter
Kitchen Exhaust
Question #1: Tim, I’m very excited about an upcoming kitchen remodel at my home. I need your advice about my kitchen exhaust fan. I’m getting conflicting information from contractors, the kitchen designer, and my husband. You’re my lifeline. Can you address the best practices for kitchen exhaust fans and any other aspects to ensure my family is safe and I don’t hurt my house. Leslie S., Tulsa OK
You may be in the same boat as Leslie. You’re either getting ready to do a big remodel of your kitchen or you’re building a new home. Much of the advice I’m about to share applies to bathroom exhaust vents, so it might behoove you to absorb some of what I’ve discovered over the years.
All you have to do is talk with a few seasoned firefighters to understand why it’s so important to pay attention to detail when installing kitchen exhaust fans. Many a restaurant has burned to the ground because of an exhaust-system fire that turned the vent pipe into a roaring jet engine.
When you cook greasy foods, the grease can vaporize much like water does when you boil water. The hot grease vapor touches exhaust fan filters, fan blades, the ductwork, your cabinets, the kitchen ceiling, and other surfaces in your kitchen. It then condenses on those surfaces. Soon there’s a layer of grease and it’s flammable. If there’s ever a fire in the exhaust ductwork, you want it to stay there.
This is but one reason you want a powerful kitchen exhaust fan so you can blow as much of this grease vapor outdoors before it has a chance to coat anything. The first step of the process is to purchase a top-quality exhaust fan that’s sized for the square footage of your kitchen.
Read the written installation instructions to understand the exact height of the fan over your cooktop for maximum performance. The instructions will also tell you the size, type, and length of the solid metal pipe or duct you must use between the fan housing and the exhaust hood on the exterior of your home. Be aware that bends in the pipe restrict flow. A 90-degree bend, for example, usually equals 10 feet of straight pipe with regards to friction.
Do not terminate the exhaust pipe in an attic or crawlspace. The exhaust must exit your home through a sidewall or out through your roof. Do not put the exhaust termination pipe under a soffit where the greasy vapor can enter soffit vents and get into your attic.
All joints where pieces of metal pipe or duct connect must be taped with a special metal tape. You can buy aluminum or even stainless steel tape that adheres well to the metal pipe. If there’s a fire in the duct, the tape prevents the fire from spreading to combustible things near the pipe.
I’ve got many other kitchen exhaust fan tips and some installation videos at my AsktheBuilder.com website. Just go to: http://test.askthebuilder.com/kitchen-exhaust-fan/
4-Way Switch Conundrum
Question #2: Help Me, Tim! Not too long ago you had a column about the vexing 3-way electrical switches. Guess what? I’ve got to replace a mysterious 4-way switch and am terrified I’ll do it wrong. Have you installed a 4-way switch and are they hard to understand? I offer you my protection forever if you can share how to connect the wires so all is well. Tony A., Winchester, KY
Not all houses have 4-way switches, but I maintain more should. At the last home I built for my family, I had a switch on the wall outside of each of our second-floor bedrooms and the hall bathroom that controlled the hallway lights. Three of those five switches had a 4-way switch in it! Downstairs there were at least six other 4-way switches on different circuits!
I actually think a 4-way switch is easier to wire up than a 3-way switch. You put 4-way switches in between 3-way switches. The traveler wires leaving or going to, the 3-way switches connect to either the top two or bottom two screws on a 4-way switch. So long as you don’t mix up the travelers from one 3-way switch to the other, you can’t go wrong.
The best part is it doesn’t matter which of the traveler wires connects to the two screws at the top or bottom of the 4-way switch. That’s what makes installing one so easy.
I realize it’s very confusing to visualize all of this jujumagumbo wire and switch talk. That’s why I recorded a step-by-step video showing how to wire up a 4-way switch. You’ll also discover a secondary video showing how to wire a 3-way switch too! Go to: http://test.askthebuilder.com/4-way-switch/
Column 1250