How to Solder Copper Pipe Video

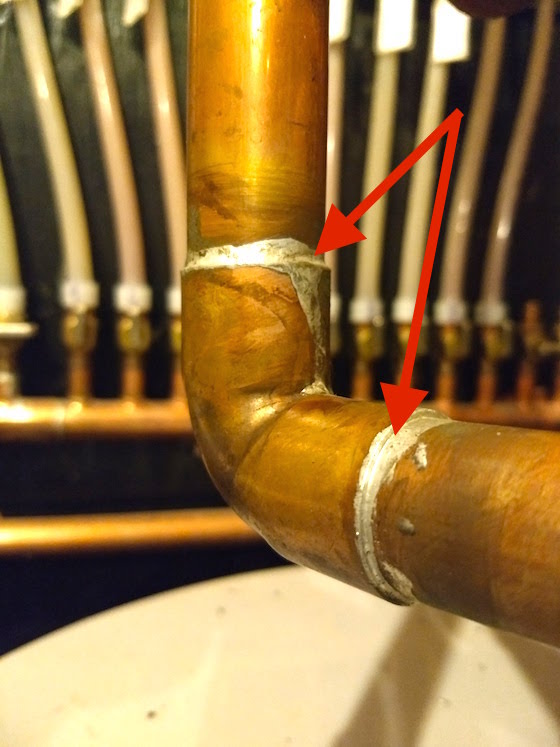
Solder copper - You do this when you melt solid solder and allow it to flow into the tiny gap between the tubing and the fitting. The red arrows point to the silver-colored solder. This popular video was shared with my readers in the March 23, 2014 Newsletter. Copyright 2018 Tim Carter
You solder copper in seconds if you have clean copper, plenty of heat, some flux and no-lead solder. Heat the tubing and fitting enough so the solder melts with the torch away from the tubing and fitting.
Revised February 2018
Solder Copper Tubing In Seconds
Related Links
Ten Easy Steps To Solder Your Copper Tubing and Water Lines
Clean Copper Is Key
You must clean the copper you intend to solder. Use abrasive cloth or plumber's sandpaper to make the copper look bright. A special round wire brush cleans the inside of copper tubing fittings.
Free & Fast Bids
Mix Up the Flux
Mix up the solder flux or paste in case it has separated. Take the solder paste brush and apply the solder flux onto the pipe and inside the fitting.
Assemble the parts to be soldered and heat up the torch. Acetylene or propane soldering torches work great.
Apply the torch to the joints for about ten seconds. Once the joint is hot, remove the torch and touch the solder to the joint. The heat in the pipes should be enough to make the solder flow into and around the joint.
If the solder doesn't melt after touching it to the copper for two seconds, pull the solder away and re-heat the tubing and fitting with the torch for an additional ten seconds.
Clean Off All Flux Residue
Once finished, use a rag to clean up the joint. Be sure to remove any excessive flux. Flux left on copper will corrode the pipe and cause a water leak.
This video was featured in the May 14, 2013 AsktheBuilder Newsletter.
5 Responses to How to Solder Copper Pipe Video